Tuesday 17 November 2020

 WORK CONTINUED


A tech drawing of the platform I've planned to construct, with the photograph of the beams edited in the correct way. In this example I will also start to plan what will go behind the platform to make up the background, with sketches like I did in the waka prints. 


Monday 16 November 2020

 INTENTIONS GOING FORWARD

I feel I have made my plans for what comes next for me in this unit as clear as I currently can. The issue I think I will move on to dealing with next is most likely what thematic underlie I want presented in the fictional spaces I am constructing. In order to do this I will begin research into the purpose of constructed reality and the aesthetic, then begin my work ahead.

Thank you for looking over the blog to its current point.

 FINISHED PRINT

 To anyone but me, some of these threads may be quite hard to string together. I had hoped to have a more complete version of a miniature construct underway by now but due to set backs in printing have been slightly delayed in this (which has worked out for the better I think), so here instead is a completed version of the print I began this blog with...


This is a collection of my own photography inspired by a location I spent many days fishing over lockdown, Dysart Harbour. So, hopefully this gives a more refined idea of the aesthetic I am hoping for in my finished works on fictional space. Suffice to say, that I expect the work I do for this brief will be far more ambitious than what is shown here as this was completed before we began the unit and so void of the research and knowledge I have now.


 COMBINING THREADS

With the Research I have shown up to this point and the developmental work reaching a point, I thought it suitable to tie the threads together in order to give a sense of what this work will be used for and how.
Shown above is an image put together from photography of my own of an abandoned building near my house in Glasgow. There are 4 photographs in this image, they come together in a fashion that creates a space, the aim here was to create a space in 2 dimensions that if thought about in 3 dimensions would provide an open platform for miniatures to be built onto...
These roughs hopefully show clearly enough what I mean by this. If this space was to be constructed in real life there would be a platform on top of which anything can be placed (refer to PLAN images). also the railing, wall on the left and the platform itself could be built in miniature. The support beam like structures at the top of the photo...
These could remain a photograph and on top of the platform...
There could be a combination of hand drawn and miniature elements layered on top. This would all be foreground and the white space in the image at the top could be used to create any style of patterned/descriptive image for a background. 


 HOW THE PRINTS WERE BUILT UP


I almost always tend to begin with the object I intend to use as a main subject/focal point, whilst this object may change its a good place to start things off I find. So here are the two drawings I did to be used as focal points in the prints I made. This rule stays the same if I am using photography as the predominant media too, as opposed to a drawing.

The print of the woman in a field is an example of the focal point changing, I uploaded my original drawing and began printing it off on a printer then  quickly and roughly adding in a possible background. I realised after having done this that it was the figure I wasn't happy with as I felt the sleeves were to unbelievable no matter how I drew them and that it took up too much space in my frame, so I reversed and redrew the figure. (Pictures go right to left)


Once happy with the baseline drawing, I upload it and put a suggestive frame around it on Photoshop. Now I print these off and start lightly and quickly drawing in the backgrounds that I want linked to the foreground through the poem used, I will maybe do 5-10 of these and pick elements I like from each.

Now, with a stable idea to go ahead with I begin making drawings and filling in details. For this step I like to use tracing paper as I would when building up a screen print as it gives me a clear image of what the key block will look like with each line added and if a mistake is made on a single image, it is probably just that one section of drawing that needs redrawn as opposed to the entire layer/opaque that needs remade as is shown across the next images...
In the case of the Kanji character I use, which is inspired by the kanji for 'love' as is in the poem, I must have drawn around about 40 of these before happy with one. The use of tracing paper allowed me to go over the sections of each previous sketched example that I liked and change the areas I didn't.


The same applies here the water wasn't something I was confident in drawing and so being able to use small pieces of a transparency instead of printing a new blank sheet off each time saved money and time, the environment too probably. However...
It isn't always as simple s I'd like it to be, the water ripples ended up causing me so much problems that I went back to trying to directly mark it on the printed sheet, hoping for extra clarity. I'm not sure that this is what helped but after multiple attempts I had one I was happy-ish with (on the right). The main issue here I think was that there wasn't enough examples of such rippling in water to draw from wherever I looked and so it was always going to be a bit of an uphill battle. I have always been better at draughting when I have good reference to work from.

This is pretty much all that's done on paper, the colour blocks I usually try and work out digitally after quickly colouring a couple of printed examples by hand and then jump straight in to cutting the blocks.


Sunday 15 November 2020

 PLANNED WAKA PRINT UPDATE


I managed to get all the blocks finished for the Waka print mock ups I showed earlier in the blog. However, there were some unexpected developments in the printing of the key blocks. As I am not used to leading with an entirely hand drawn key block, I forgot to account for the excessive levels of white space and did not dig deep enough canals around the fine detail so, there were sections picking up ink that I did not want to, as can clearly be seen. I am in the process of fixing this and will hopeful begin printing again shortly.


 MINIATURE DEVELOPMENT

The idea of interspersing miniatures captured with photography into landscapes taken from the real world or drafted by hand came over summer, when I got really into the work of several miniature artists through watching a lot of films that used miniatures in the production on quite a large scale.

FILMS


Shots from the set of Bladerunner 2049, directed by Denis Villeneuve:
Miniature designs that take up the entire space of a warehouse floor, depicting L.A of the future


more images of cinematic realities, this one for Kubo and the Two Strings a stop motion production by Studio Laika. 
This got me interested further in the idea of fictional realities and so I began looking into artists that had attempted to create a fictional space through the use of miniatures, for what reason and why it was that miniatures were best suited...


These are all 4, photographs of miniatures created by artist Lori Nix and Kathleen Gerber, they use miniatures as they want to explore the city after Humans have left it and the decay of spaces. Instead of finding such space in the real world they prefer the comfort of making it, thereby having complete control. All of these images are from videos found on Youtube, which I continue to find to be a fantastic resource not just for researching but also for help in certain practical processes too...


 SOURCE


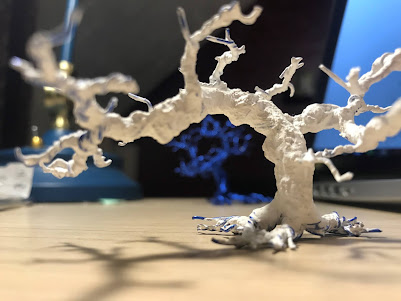
For hobby-crafts such as modelling/miniature building there are a great deal of walk-through style videos from beginner all the way through to professional level examples, building anything from basic trees to entire landscapes, or basic furniture to whole buildings. I found all this really helpful when I didn't know where to start with modelling. A model tree seemed simple and with this I'm sure it was made much more so.

VIDEO SOURCES

https://www.youtube.com/watch?v=sLxxbfsj8IM&t=123s - Weta Workshop - Bladerunner 2049 Miniatures, Weta Workshop

https://www.youtube.com/watch?v=JncuykDwT8A&t=286s - Behind the Scenes of Kubo and the Two Strings - BBC Click, BBC click

https://www.youtube.com/watch?v=nZh3Oi7d0q0&t=55s - See an Apocalyptic World Envisioned in Miniature | Short Film Showcase, National Geographic

https://www.youtube.com/watch?v=0FNQTxX_jT4 - Wire Tree Tutorial - Model Railroad, Luke Towan


I wanted to test my model making skills to see whether or not this would be a feasible process to use in the making of something 'real'. 


At this stage I was confident of the end result believing that this would work, re-assuring myself that model making was something I could manage for the upcoming unit.


At this stage I began to despair, the plaster didn't set correctly around the tree it made it look somewhat false and I couldn't see how an amateur paint job could improve it much. I was beginning to lose hope in the possibilities for the application of such a process


At this point I was all but ready to throw in the towel and admit defeat on the modelling front, beginning to really worry how someone with little skill in miniature building could use such a technique to build something convincing. However...


I pushed on and saw the process to the end, which I was really quite happy about. In my print work I tend to use photography hollowed out to a black, white- stamp effect that I can then engrave into woodblock. After applying this technique to the photograph I had taken, I was happy to see that the result was fairly good and certainly of high enough caliber for the purposes intended.